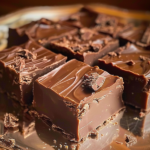
Old-Fashioned Chocolate Fudge: A Classic Sweet Treat
Old-fashioned chocolate fudge is a timeless dessert that has been cherished by generations. With its rich, velvety texture and deep chocolate flavor, it’s no wonder that this classic treat remains a favorite among chocolate lovers. Whether you’re looking to indulge in a sweet snack or need a special gift for a loved one, homemade chocolate fudge is the perfect choice. In this blog post, we’ll dive into the history of chocolate fudge, explore the step-by-step process of making it, and offer tips and variations to help you achieve the perfect batch every time.
Ingredients
- 2 cups white sugar
- 1/2 cup cocoa
- 1 cup milk
- 4 tablespoons butter
- 1 teaspoon vanilla extract
Instructions
1. Prepare Your Equipment
Before you begin, gather all your equipment. You’ll need a heavy-bottomed saucepan, a wooden spoon, a candy thermometer, and an 8-inch square baking dish. Line the baking dish with parchment paper or lightly grease it to prevent the fudge from sticking.
2. Combine the Ingredients
In your saucepan, combine the sugar, cocoa, and milk. Stir the mixture over medium heat until the sugar is fully dissolved. It’s important to stir constantly to prevent the mixture from scorching on the bottom of the pan.
3. Cook the Fudge
Once the sugar is dissolved, stop stirring and allow the mixture to come to a boil. Insert your candy thermometer into the mixture and continue to cook until it reaches the soft-ball stage, which is between 234°F and 240°F (112°C to 116°C). This stage is crucial for achieving the right texture, so be sure to keep a close eye on the thermometer.
4. Add Butter and Vanilla
Once the mixture reaches the soft-ball stage, remove it from the heat. Add the butter and vanilla extract, but do not stir. Allow the mixture to cool undisturbed until it reaches about 110°F (43°C).
5. Beat the Fudge
Once cooled, use a wooden spoon to beat the fudge until it thickens and loses its gloss. This process may take several minutes, and you’ll notice the mixture becoming more opaque and firm as you go.
6. Pour and Set
Quickly pour the fudge into your prepared baking dish, spreading it evenly with the back of a spoon. Allow it to cool completely at room temperature before cutting it into squares.
Tips for Perfect Old-Fashioned Chocolate Fudge
Making old-fashioned fudge can be a bit tricky, especially if you’re new to candy-making. Here are some tips to help you get it right:
1. Use a Candy Thermometer
A candy thermometer is essential for making fudge. It ensures that the mixture reaches the correct temperature for the soft-ball stage. Without it, you risk undercooking or overcooking the fudge, leading to a texture that is either too soft or too hard.
2. Stir with Care
While it’s important to stir the sugar and cocoa mixture at the beginning to dissolve the sugar, avoid stirring once it begins to boil. Stirring during the boiling process can cause the sugar to crystallize, resulting in a grainy texture.
3. Be Patient When Cooling
Allowing the fudge to cool undisturbed after adding the butter and vanilla is crucial. This cooling period helps to set the fudge and makes it easier to beat later. Rushing this step can lead to fudge that doesn’t set properly.
4. Beat Until Thickened
The beating process is what gives old-fashioned fudge its creamy texture. Be patient and continue to beat the mixture until it thickens and loses its shine. If you stop too soon, the fudge may not set correctly.
5. Store Properly
Once your fudge is made, store it in an airtight container at room temperature. It will keep for up to two weeks, although it’s unlikely to last that long!
